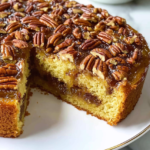
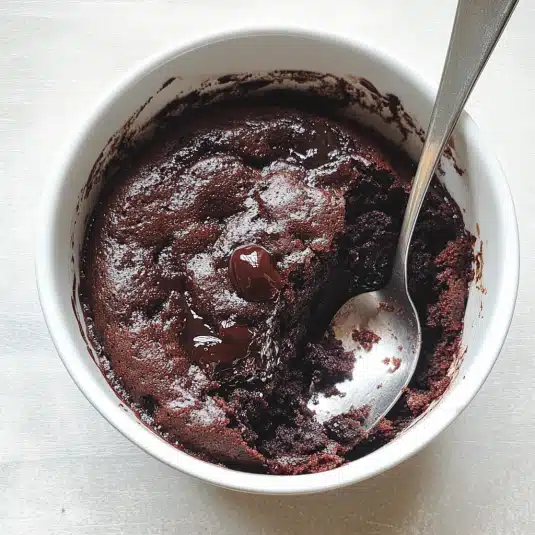
This chocolate pudding cake is a self-saucing chocolate dessert that bakes into two perfect layers with almost no effort. As it cooks, a soft and rich chocolate cake forms on top while a thick, gooey hot fudge sauce develops underneath using simple pantry ingredients and a foolproof method.

Unlike many recipes that result in a dry cake or thin sauce, this version is fully tested and beginner-friendly, with clear steps that deliver consistent results. No mixer and no special equipment are needed. Just an easy chocolate pudding cake that feels indulgent and restaurant-quality every single time.
Table of Contents
Why This is Your New Favorite Chocolate Dessert
This cake checks every box for a go-to dessert. It’s fast to prepare, uses basic ingredients, and comes out rich and gooey every time. There’s no mixer required. Just two bowls and a spoon will get the job done.
What makes it special is the self-saucing method. You pour hot water over the batter before baking, and like magic, a fudgy sauce forms underneath the cake. The result is warm, soft chocolate cake on top with a thick, molten sauce underneath.
It’s perfect for last-minute cravings or impressing guests with something that looks fancy but takes very little effort. If you love desserts that feel indulgent yet are easy to make, this one will quickly become your favorite.
Ingredients: Simple List with Expert Notes
Chocolate Pudding Cake Recipe
Dry Ingredients
- 1 cup all-purpose flour
- ¾ cup granulated sugar
- 2 tablespoons unsweetened cocoa powder
- 2 teaspoons baking powder
- ¼ teaspoon salt
Wet Ingredients
- ½ cup milk
- 2 tablespoons unsalted butter, melted
- 1 teaspoon vanilla extract
Topping
- ½ cup brown sugar
- ¼ cup unsweetened cocoa powder
- 1¼ cups hot water
Ingredient Decisions and Pro-Tips
Cocoa Powder
Use Dutch-processed cocoa powder for a deeper chocolate flavor. It’s less acidic and makes the cake taste more like dark chocolate.
Sugar Choice
Some bakers use white sugar in the topping. Brown sugar works better here because it gives the sauce a richer taste and a slightly thicker texture from the molasses.
Butter and Milk
Use real butter for the best flavor. If you’re using plant-based milk, make sure it’s unsweetened so it doesn’t change the taste of the cake.
Hot Water Step
The water must be hot but not boiling. This activates the cocoa and helps form the fudge layer underneath the cake.
These tips are simple but make a big difference in the final texture and flavor.
Step-by-Step Method (The Magic of the Self-Saucing Technique)
This method is simple and clear. Follow each step exactly to get that gooey fudge sauce on the bottom and fluffy cake on top.
1. Preheat the oven
Set your oven to 350°F and lightly grease an 8×8 inch baking dish. A glass or ceramic dish works best.
2. Mix the dry ingredients
In a medium bowl, whisk together the flour, sugar, cocoa powder, baking powder, and salt.
3. Add the wet ingredients
In a separate bowl, combine the milk, melted butter, and vanilla. Pour the wet mixture into the dry ingredients and stir just until combined. Do not overmix.
4. Spread the batter
Pour the batter into your greased dish and smooth the top with a spatula.
5. Make the topping
In another bowl, mix the brown sugar and cocoa powder. Sprinkle this mixture evenly over the batter.
6. Add the hot water
Slowly pour the hot water over the back of a spoon and let it cover the entire surface. This helps it settle gently without disturbing the topping. Do not stir.
7. Bake
Place the dish in the oven and bake for 35 to 40 minutes. The top should look set and the edges should start pulling away slightly.
8. Cool slightly and serve
Let it rest for 10 minutes before serving. This allows the sauce to thicken slightly while staying gooey and rich.
Visual Help
To avoid confusion with the hot water step, watch the video below. It shows exactly how to layer the topping and pour the water without mixing. This is the key to getting the right texture.
The Science Behind This Self-Saucing Chocolate Pudding Cake
What makes this chocolate pudding cake so unique isn’t magic — it’s simple food science working perfectly in the oven.
When the batter is topped with a dry mixture of cocoa powder and sugar, then covered with hot water, two key reactions happen during baking.
First, the baking powder in the cake batter activates as it heats, releasing carbon dioxide. This causes the cake layer to rise and set on the surface, forming a soft but structured sponge.
At the same time, the hot water dissolves the sugar and cocoa topping, creating a liquid chocolate mixture. Because this liquid is heavier than the cake batter, it naturally sinks to the bottom of the pan as the cake rises upward.
As the cake bakes, the bottom layer stays moist and hot, preventing it from setting like a normal cake. Instead, it thickens into a rich, pudding-like sauce. Meanwhile, the top layer finishes baking, creating the signature two-layer dessert: cake on top, warm chocolate sauce underneath.
The key factors that make this work are:
- Hot water, which dissolves the sugar and activates the cocoa
- Proper leavening, which lifts the cake away from the sauce
- No stirring, allowing gravity to separate the layers naturally
This precise balance of heat, moisture, and leavening is what guarantees the self-saucing effect every time.
Print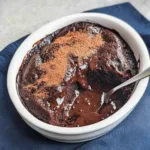
Chocolate Pudding Cake
- Total Time: 50 minutes
- Yield: 6 servings 1x
- Diet: Vegetarian
Description
A rich, gooey chocolate pudding cake with a soft top and fudgy sauce underneath. Quick to prepare, no mixer needed, and made with pantry staples.
Ingredients
- 1 cup all-purpose flour
- ¾ cup granulated sugar
- ¼ cup unsweetened cocoa powder
- 2 teaspoons baking powder
- ¼ teaspoon salt
- ½ cup milk
- 2 tablespoons melted butter
- 1 teaspoon vanilla extract
- ½ cup packed brown sugar
- ¼ cup unsweetened cocoa powder
- 1 ¼ cups hot water
Instructions
- Preheat oven to 350°F and grease an 8×8-inch baking dish.
- In a medium bowl, whisk flour, granulated sugar, ¼ cup cocoa powder, baking powder, and salt.
- Stir in milk, melted butter, and vanilla extract until smooth.
- Spread the batter evenly into the prepared baking dish.
- In a small bowl, combine brown sugar and ¼ cup cocoa powder, then sprinkle over the batter.
- Gently pour hot water over the top using the back of a spoon. Do not stir.
- Bake for 35 to 40 minutes until the top looks set and a toothpick inserted comes out with moist crumbs.
- Let rest for 10 to 15 minutes before serving warm with ice cream if desired.
Notes
Make sure the water is very hot (not boiling) to create a gooey sauce. Dutch-process cocoa gives deeper flavor. Avoid overbaking to maintain the fudgy bottom.
- Prep Time: 15 minutes
- Cook Time: 35 minutes
- Category: Dessert
- Method: Baking
- Cuisine: American
Nutrition
- Serving Size: 1 serving
- Calories: 195 kcal
- Sugar: 23 g
- Sodium: 178 mg
- Fat: 6 g
- Carbohydrates: 36 g
- Fiber: 2 g
- Protein: 4 g
Why Did the Recipe Fail? (Real Troubleshooting Guide)
This chocolate pudding cake is designed to be foolproof, but small mistakes can affect the final result. If something didn’t turn out as expected, here’s exactly why and how to fix it.
❌ Problem 1: The Sauce Is Too Thin or Watery
Likely causes:
- The cake was removed from the oven too early
- The baking dish was too large, spreading the sauce too thin
- The oven temperature was lower than required
How to fix it:
- Bake until the top of the cake looks fully set and matte, not glossy
- Use an 8×8-inch baking dish for the best cake-to-sauce ratio
- Let the cake rest for 10 minutes after baking — the sauce thickens as it cools
Pro tip:
The sauce is not meant to be thick straight out of the oven. It reaches its ideal consistency after resting.
❌ Problem 2: The Cake Is Dry or Overbaked
Likely causes:
- Baking too long (the most common mistake)
- Oven running hotter than expected
- Using a smaller or deeper pan without adjusting bake time
How to fix it:
- Do not test doneness in the center the sauce will always make it look underbaked
- Check the edges only: they should be set but still soft
- Remove the cake when the edges begin to gently pull away from the pan
Golden rule:
A pudding cake should always lean slightly underbaked rather than dry.
❌ Problem 3: The Flavor Is Bitter or Unbalanced
Likely causes:
- Low-quality or overly acidic cocoa powder
- Too much cocoa in the topping layer
- Sweetened or flavored milk altering the balance
How to fix it:
- Use Dutch-processed cocoa powder for a smoother, deeper chocolate flavor
- Measure the topping ingredients carefully
- Use unsweetened milk and pure vanilla extract
Expert tip:
A small amount of salt (¼ teaspoon) enhances chocolate flavor and balances bitterness.
❌ Problem 4: The Cake Didn’t Separate Into Two Layers
Likely causes:
- Stirring after adding the hot water
- Water wasn’t hot enough
- Uneven distribution of the cocoa-sugar topping
How to fix it:
- Never stir after pouring the water
- Use hot (not warm) water
- Make sure the cocoa-sugar mixture fully covers the batter before adding water
The real secret:
Hot water + sugar + cocoa create the sauce.
Change one element, and the magic won’t happen.
Expert Baking Tips and Troubleshooting
This section answers the small questions that make a big difference. It’s where you learn how to avoid common mistakes and get perfect results every time.
The Definitive Pan Size Guide
8×8 inch square dish
This is the best option. The cake rises well and the sauce stays thick. Bake for 35 to 40 minutes.
9×13 inch rectangle
The cake layer will be thinner and the sauce may spread more. Reduce baking time to 30 to 35 minutes and check early to avoid overbaking.
Individual ramekins
Perfect for serving guests. Fill each ramekin two-thirds full and bake for 20 to 25 minutes. Place them on a baking tray to catch any spill.
Using the right pan keeps the texture balanced and helps the sauce form properly.
How to Prevent a Dry Pudding Cake
Overbaking is the most common mistake. This dessert should have a soft top and a gooey bottom. Here’s how to know it’s ready:
- The top looks firm and matte, not glossy.
- The edges start pulling away from the dish.
- A toothpick inserted into the edge comes out clean, but not from the center.
If your cake is dry, it likely baked too long or the oven was too hot.
Ingredient Substitutions and Smart Swaps
This chocolate pudding cake is flexible and forgiving. If you’re missing an ingredient or need a dietary alternative, use the substitutions below without sacrificing texture or flavor.
| Original Ingredient | Best Substitute | Result & Notes |
|---|---|---|
| Whole milk | Unsweetened almond milk | Keeps the cake light and moist; neutral flavor |
| Whole milk | Unsweetened oat milk | Slightly creamier texture, great for dairy-free |
| Whole milk | Soy milk | Closest protein structure to dairy milk |
| Unsalted butter | Plant-based butter | Maintains richness for dairy-free or vegan |
| Unsalted butter | Coconut oil (melted) | Adds subtle coconut note; use refined for neutral flavor |
| Granulated sugar | Coconut sugar | Deeper caramel flavor; sauce slightly darker |
| Granulated sugar | White sugar + 1 tsp molasses | Mimics brown sugar if unavailable |
| Brown sugar | Dark brown sugar | Richer, more intense fudge sauce |
| Brown sugar | Coconut sugar | Sauce slightly thinner but still flavorful |
| All-purpose flour | 1:1 gluten-free flour blend | Texture stays soft; avoid almond flour |
| Dutch-processed cocoa | Natural cocoa powder | Works, but flavor is slightly more acidic |
| Vanilla extract | Vanilla bean paste | More intense vanilla aroma |
| Hot water | Freshly brewed hot coffee | Enhances chocolate flavor (no coffee taste) |
Important Notes for Best Results
- Always use unsweetened plant-based milk to avoid overpowering sweetness
- Avoid low-fat milk substitutes fat is essential for a rich sauce
- Do not reduce the liquid amount when using substitutions
- Keep the hot water step unchanged it’s critical for the self-saucing effect
Storage and Making Ahead
Serving warm
This cake is best served warm. If making ahead, reheat it gently in the oven or microwave to bring back the gooey texture.
Storing leftovers
Let the cake cool completely before covering it. Store in the fridge for up to three days. The sauce may thicken slightly, but the flavor stays rich.
Make-ahead tip
You can mix the dry and wet batter ingredients separately a few hours in advance. Just combine them and bake when ready. Do not add the hot water until just before baking.
These tips will help you bake with confidence and enjoy the cake at its best.
Substitutions and Dietary Variations
This section helps you adapt the recipe to fit your needs without sacrificing taste or texture. Whether you’re avoiding dairy or baking from limited pantry ingredients, these options have you covered.
Dairy-Free and Vegan Swaps
Milk
Use unsweetened almond milk, oat milk, or soy milk. Avoid flavored or sweetened varieties, as they can change the taste.
Butter
Swap with plant-based butter or coconut oil. Both will keep the richness while making the dessert dairy-free.
Eggs
This recipe doesn’t use eggs, which makes it naturally friendly for egg-free or vegan diets.
With these changes, the cake stays moist and the sauce still forms perfectly.
The Chocolate Depression Cake Angle
This variation comes from a time when ingredients were scarce and creativity mattered most. Chocolate Depression Cake uses simple pantry staples like flour, sugar, cocoa powder, vinegar, oil, and baking soda. It’s naturally egg-free and dairy-free, making it a great choice for tight budgets or food allergies.
You can draw inspiration from that version to create a simpler or more affordable pudding cake using the same self-saucing technique.
Final Thoughts
This chocolate pudding cake brings comfort and indulgence together in one dish. With a soft, rich cake on top and a warm fudge sauce underneath, it feels like a treat that took hours to make. In reality, it’s simple, quick, and easy enough for any night of the week.
You don’t need special tools or rare ingredients. Just basic pantry items, hot water, and a few clear steps. Whether you’re serving it to guests or baking for yourself, it always delivers. It’s forgiving, satisfying, and guaranteed to impress without stress.
Now that you know how it works and how to customize it, you’ve got everything needed to bake with confidence. This recipe isn’t just foolproof. It’s unforgettable.
Fore more recipes follow me in Facebook, medium and Pinterest
FAQs
How is pudding cake made?
Pudding cake starts with a basic chocolate cake batter. After that, a mix of sugar and cocoa is sprinkled on top. Then, hot water is poured over the surface without stirring. During baking, the water sinks to the bottom and forms a hot fudge-like sauce while the cake rises to the top.
What’s the difference between cake and pudding cake?
A regular cake has a consistent texture from top to bottom. A pudding cake bakes into two layers. The top is soft and cake-like, and the bottom becomes a warm, gooey sauce. This makes it feel like a dessert and a sauce in one dish.
What does pudding do for cake?
In this recipe, “pudding” refers to the sauce that forms naturally. There is no instant pudding mix involved. The hot water reacts with the sugar and cocoa on top to create a rich sauce under the cake. It gives the dessert its signature texture and extra moisture.
How much pudding do I add to cake mix?
This recipe does not use a boxed cake mix or pudding mix. Everything is made from scratch. If you’re adding pudding to a boxed mix in other recipes, usually one small box (around 3.4 ounces) of instant pudding powder is added to improve moisture. For this homemade pudding cake, the sauce forms on its own during baking.
Can you bake with pudding?
Yes, pudding can be used in baking to add moisture and richness. In this cake, though, pudding is not an ingredient. It’s a result of how the layers are baked. The hot water step makes the sauce, giving it a pudding-like feel.
What is the secret to make a cake moist?
Avoid overbaking. That’s the number one tip. Also, use the right balance of fat and liquid. In this recipe, butter and milk provide moisture. Letting the cake rest for a few minutes after baking also helps the sauce thicken without drying out the top layer.