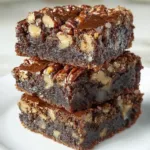
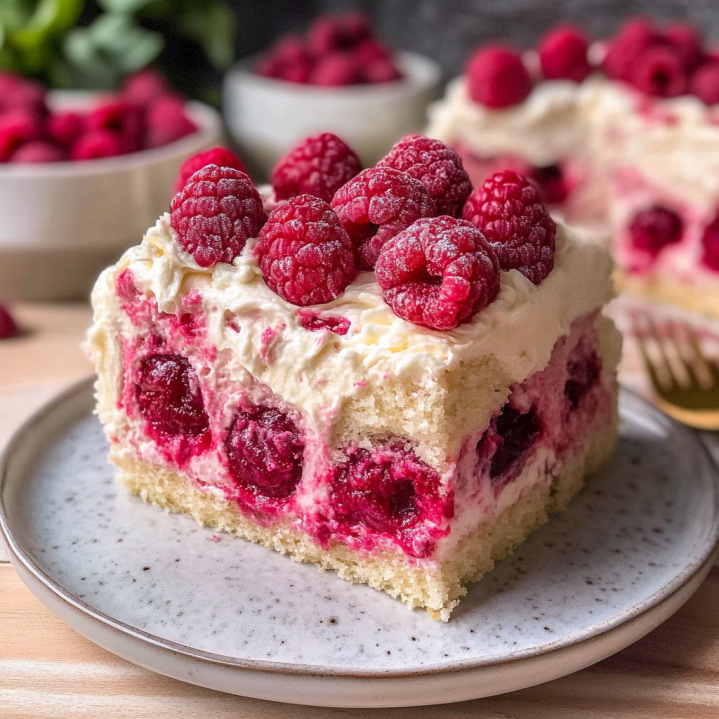
There is something special about the mix of sweet and tart in a cake like this. I have baked many versions over the years, and this flavor pairing always stands out. The smooth taste of white chocolate meets the bright, slightly sharp bite of raspberries. Each bite feels balanced, not too sweet, not too heavy.
Many people know the popular white chocolate raspberry cake Costco version. It is soft and creamy, but it often leans very sweet. A homemade version gives you more control. You get real cocoa butter flavor from quality chocolate, and a richer raspberry layer that tastes fresh, not artificial.
The smooth white chocolate creates a velvety texture, while the raspberries bring a fresh tartness balance that keeps each bite light.
Table of Contents
Homemade vs White Chocolate Raspberry Cake Costco
To make this section stronger and more SEO-friendly, adding a clear comparison table helps both readers and search engines quickly understand the differences.
Visual Comparison Table
| Feature | Costco Cake | This Homemade Recipe |
|---|---|---|
| White Chocolate Quality | Lower cocoa butter, often mixed with stabilizers | Real white chocolate with high cocoa butter content |
| Raspberry Filling | Pre-made, often very sweet and uniform | Fresh raspberry reduction, balanced and slightly tart |
| Sugar Level | High sweetness with limited control | Adjustable sweetness based on your preference |
| Preservatives | Contains additives for longer shelf life | No preservatives, made fresh |
| Texture | Soft but slightly dense | Light, moist, and clean layers |
| Flavor Depth | Sweet-focused | Balanced sweet and tart contrast |
Why This Recipe Works
This cake is built on simple baking science. Each choice has a purpose, and that is what gives you a moist texture and stable layers.
First, the fat balance matters. Butter adds flavor and a soft crumb. Oil adds moisture that lasts longer. When you use both, you get the best of each. The cake stays tender but does not dry out after one day. Many recipes use only butter, which can lead to a firmer texture once chilled.
Second, real white chocolate makes a big difference. Good white chocolate contains cocoa butter, not just sugar and fillers. This gives the cake a smooth taste and helps the ganache set with a clean, creamy texture. Using low quality chocolate can lead to a greasy or overly sweet result.
Another key point is structure. This cake is designed to hold layers without collapsing. That is where the buttercream dam comes in. You pipe a ring of frosting around the edge of each layer before adding the raspberry filling. This simple step keeps the filling in place and stops it from leaking out the sides. Many home bakers skip this and end up with uneven layers.
Temperature also plays a role. Room temperature ingredients mix more evenly. This creates a smooth batter and a consistent crumb. Cold ingredients can cause the batter to split, which affects the final texture.
Each of these steps may seem small, but together they create a cake that looks clean, slices well, and tastes balanced. That is what sets it apart from basic versions.
Key Ingredients and Expert Tips
The quality of your ingredients shapes the final result. Small choices here can change the texture, flavor, and stability of your cake.
Choosing the Best White Chocolate
White chocolate is the heart of this recipe. Not all products labeled as white chocolate are the same. Many baking chips contain less cocoa butter and more sugar or stabilizers. This affects both taste and texture.
For the best result, use a baking bar with real cocoa butter listed as a main ingredient. It melts smoothly and gives a clean, creamy finish. When melted into ganache or frosting, it creates a silky texture that chips cannot match.
Chop the chocolate into small, even pieces before melting. This helps it melt evenly and reduces the risk of overheating.
The Raspberry Element
Raspberries bring balance to the sweetness of white chocolate. You can use fresh or frozen berries, and both work well with the right method.
Fresh raspberries give a brighter flavor and slightly firmer texture. They are great when in season. Frozen raspberries are more consistent year round and often more affordable. They also break down faster when cooked, which is useful for making a smooth filling.
If you use frozen berries, do not thaw them fully before cooking. Add them straight to the pan to keep the flavor concentrated.
For a cleaner texture, strain the raspberry mixture to remove seeds. This creates a smooth filling that spreads easily between layers.
Flour and Structure
Cake flour is the best choice for a soft and tender crumb. It has less protein than all purpose flour, which keeps the cake light. If you only have all purpose flour, you can still use it, but the texture will be slightly firmer.
Measuring by weight gives better accuracy. A kitchen scale helps you avoid adding too much flour, which can make the cake dense.
Flavor Boosters
A small amount of almond extract can lift the raspberry flavor without overpowering the cake. It adds a subtle depth that pairs well with both the berries and the white chocolate.
Use it sparingly. A little goes a long way.
Temperature and Mixing
Bring all ingredients to room temperature before mixing. This includes eggs, butter, and any dairy. When ingredients are at the same temperature, they blend smoothly and create a stable batter.
Mix just until combined. Overmixing can lead to a tough texture. The goal is a smooth batter without extra air or excess gluten development.
These small details make a big difference. When you follow them, your cake will have a soft crumb, clean layers, and a balanced flavor that stands out.
Dietary Substitutions
You can adjust this cake to fit different dietary needs without losing its core flavor and texture.
Gluten Free Option
Replace the cake flour with a gluten free baking blend that includes xanthan gum. This helps maintain structure and prevents the cake from becoming crumbly. Measure by weight for best accuracy. The texture will be slightly softer, but still stable enough for layering.
Dairy Free Option
Swap the butter with a plant based alternative that has a high fat content. Use dairy free milk such as almond or oat milk. For the white chocolate, choose a dairy free version made with cocoa butter. Make sure it melts smoothly before adding it to the batter or frosting.
Egg Alternative
If needed, you can use a yogurt based substitute or a commercial egg replacer. This may slightly change the texture, but the cake will still hold together well.
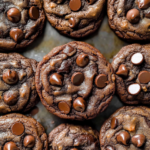
White Chocolate Raspberry Cake
- Total Time: 1 hour
- Yield: 8 servings 1x
Description
There is something special about the mix of sweet and tart in this cake. The smooth taste of white chocolate meets the bright, slightly sharp bite of raspberries. Each bite feels balanced, not too sweet, not too heavy, with a soft crumb and clean layers that make it stand out from basic versions.
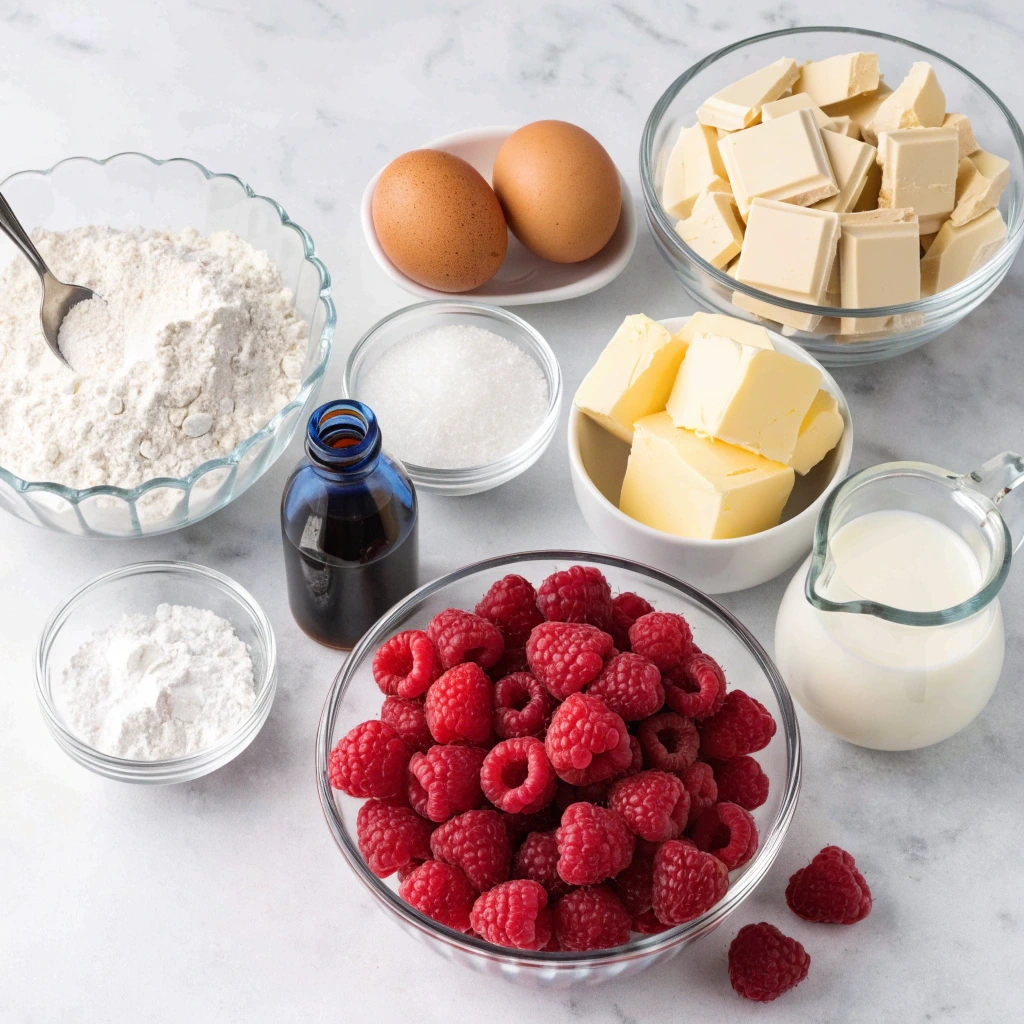
Ingredients
- 250g cake flour
- 10g baking powder
- 3g salt
- 120g butter (softened)
- 60ml oil
- 200g sugar
- 4 eggs
- 150g white chocolate (real cocoa butter)
- 5ml vanilla extract
- 180ml milk
- 250g raspberries (fresh or frozen)
- 80g sugar (for filling)
- 10g cornstarch + 30ml water
- 200g powdered sugar
- 200g butter (for frosting)
- 100g white chocolate (melted for frosting)
- 60ml cream
Instructions
- Preheat oven to 170°C and grease cake pans.
- Whisk together cake flour, baking powder, and salt.
- Beat butter, oil, and sugar until light and smooth.
- Add eggs one at a time, mixing well after each addition.
- Stir in melted white chocolate and vanilla extract.
- Add dry ingredients alternating with milk and mix until combined.
- Divide batter into pans and bake for 25–30 minutes.
- Cool cakes completely before assembling.
- Cook raspberries over medium heat until broken down.
- Strain mixture to remove seeds.
- Return to heat, add sugar and cornstarch slurry, and thicken.
- Cool filling completely.
- Beat butter, powdered sugar, melted white chocolate, and cream to make frosting.
- Level cake layers.
- Pipe a buttercream dam around edges.
- Add raspberry filling inside the dam.
- Stack layers and repeat process.
- Apply a crumb coat and chill.
- Finish with final frosting layer and smooth.
Notes
Use high quality white chocolate with real cocoa butter for best results. Always use room temperature ingredients for a smooth batter. Do not skip the buttercream dam to prevent filling from leaking. Let the raspberry filling cool completely before assembling.
- Prep Time: 30 minutes
- Cook Time: 30 minutes
- Category: Dessert
- Method: Baking
- Cuisine: International
Nutrition
- Serving Size: 1 slice
- Calories: 520
- Sugar: 38g
- Sodium: 220mg
- Fat: 28g
- Saturated Fat: 16g
- Unsaturated Fat: 10g
- Trans Fat: 0g
- Carbohydrates: 62g
- Fiber: 2g
- Protein: 6g
- Cholesterol: 110mg
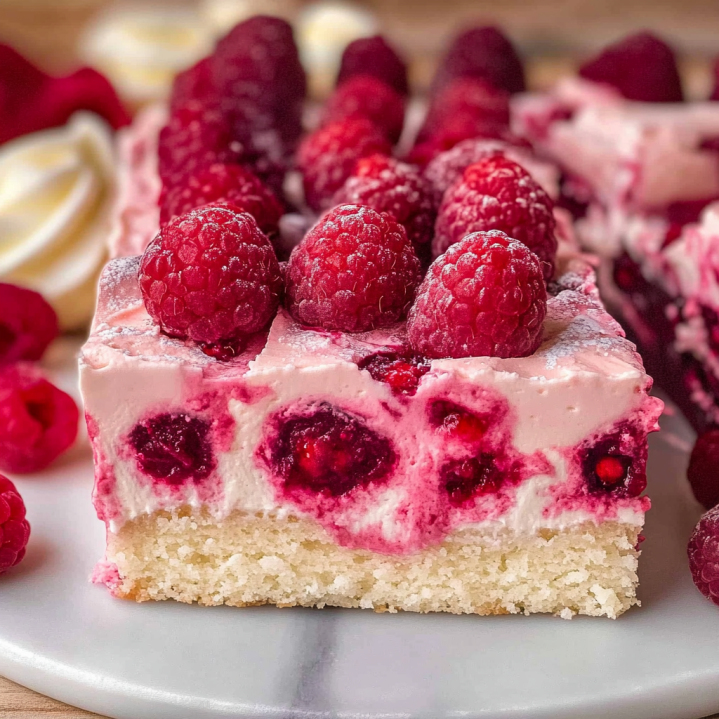
The Perfect White Chocolate + Raspberry Cake Filling
This filling is what sets the cake apart. A good raspberry layer should be thick, smooth, and full of flavor. It should sit neatly between the layers without soaking into the cake or spilling out the sides.
Step 1: Cook the Raspberries
Add raspberries to a saucepan over medium heat. You can use fresh or frozen berries. As they heat, they will release juice and start to break down.
Stir gently and let the mixture simmer until the fruit is soft and fully broken apart. This usually takes about 8 to 10 minutes.
Step 2: Strain for a Smooth Texture
Pour the mixture through a fine mesh strainer into a bowl. Press with a spoon to extract as much liquid as possible while leaving the seeds behind.
This step gives you a smooth, seedless puree that spreads easily and looks clean in each slice.
Step 3: Thicken the Filling
Return the strained puree to the saucepan. Add sugar and a small amount of cornstarch slurry. Stir well and cook over medium heat.
As it heats, the mixture will thicken. Keep stirring to avoid lumps. The goal is a consistency similar to jam, not runny and not too stiff.
If the filling is too thin, it will soak into the cake. If it is too thick, it will be hard to spread. Aim for a soft but stable texture.
Step 4: Cool Completely
Transfer the filling to a bowl and let it cool to room temperature. As it cools, it will thicken further.
Do not use it while warm. Warm filling can melt the frosting and cause layers to shift.
Step 5: Flavor Balance Tip
Taste the filling once cooled. If it feels too sharp, add a small amount of sugar. If it feels too sweet, a few drops of lemon juice can brighten the flavor.
This balance is key. The raspberry layer should cut through the sweetness of the white chocolate without overpowering it.
When done right, this filling adds a fresh, vibrant layer that gives the cake its signature contrast in both flavor and texture.
Variation: Raspberry White Chocolate Bundt Cake
Not everyone wants to build and stack a layer cake. If you prefer something simpler, this recipe can be turned into a raspberry white chocolate bundt cake with great results.
Start by preparing the same cake batter. Instead of dividing it into layers, pour it into a well greased bundt pan. Make sure every corner of the pan is coated to prevent sticking.
For the raspberry element, you have two options. You can swirl a thick raspberry filling into the batter before baking, or you can serve it as a topping after the cake is done. If you choose to swirl it, keep the filling thick so it does not sink to the bottom.
Bake at the same temperature, but extend the baking time. A bundt cake is deeper, so it needs more time to cook through. Check for doneness by inserting a skewer into the center. It should come out clean or with a few soft crumbs.
Once baked, let the cake cool in the pan for about 15 minutes. Then turn it out onto a rack and allow it to cool fully before adding any glaze.
For the finish, pour a white chocolate glaze over the top. Let it drip naturally down the sides. You can spoon a little raspberry sauce over each slice for extra flavor and color.
This version is easier to serve and works well for casual events. You still get the same flavor contrast, but with less assembly and less time spent decorating.
Step by Step Instructions
Follow these steps in order. Each part builds on the next and helps you get clean layers and a stable cake.
1. Prepare the Cake Batter
- Preheat your oven to 170°C. Grease and line your cake pans.
- In a bowl, whisk together cake flour, baking powder, and salt.
- In another bowl, beat butter, oil, and sugar until light and smooth.
- Add eggs one at a time. Mix well after each addition.
- Stir in melted white chocolate and vanilla extract.
- Add the dry ingredients in parts, alternating with milk. Mix until just combined.
The batter should be smooth and slightly thick.
2. Bake the Cake Layers
- Divide the batter evenly between pans.
- Bake for 25 to 30 minutes or until a toothpick comes out clean.
- Let the cakes cool in the pans for 10 minutes.
- Transfer to a rack and cool completely.
Do not rush this step. Warm cake can break during assembly.
3. Prepare the Frosting
- Beat butter until soft and creamy.
- Add powdered sugar in stages. Mix slowly at first.
- Pour in melted white chocolate and a splash of cream.
- Beat until smooth and fluffy.
The frosting should hold its shape but still be easy to spread.
4. Level the Cake Layers
Use a serrated knife to trim the tops if needed. Flat layers stack better and look cleaner when sliced.
5. Build the Buttercream Dam
This step prevents the filling from leaking.
- Place the first cake layer on a board.
- Pipe a thick ring of frosting around the edge.
- Fill the center with raspberry filling.
- Spread it evenly without touching the edges.
This ring acts as a barrier and keeps the filling in place.
6. Assemble the Cake
- Add the next layer on top.
- Repeat the dam and filling process.
- Place the final layer upside down for a flat top.
Press gently to keep the layers even.
7. How to Crumb Coat
A crumb coat locks in loose crumbs and creates a smooth base.
- Spread a thin layer of frosting over the entire cake.
- Cover all sides, even if it looks rough.
- Chill the cake for 20 to 30 minutes.
After chilling, apply the final layer of frosting. This second coat will look clean and polished.
Take your time with this step. A good crumb coat makes a big difference in the final look.
Comparison: Homemade vs White Chocolate Raspberry Cake Costco
Many people compare a homemade version to the popular white chocolate raspberry cake Costco sells. Both look appealing, but there are clear differences in taste, texture, and ingredient quality.
Key Differences
Costco Version
- Very convenient and ready to serve
- Consistent look and texture
- Sweeter profile with a heavier feel
- Often uses stabilizers and flavoring instead of fresh ingredients
This Homemade Recipe
- Made from scratch with real white chocolate that contains cocoa butter
- Fresh raspberry reduction with a natural tart flavor
- Balanced sweetness that does not feel overwhelming
- Texture stays soft while still holding clean layers
Flavor and Texture
The biggest difference comes from flavor balance. Store cakes tend to lean very sweet. This version focuses on contrast. The white chocolate gives a creamy base, while the raspberry filling adds a fresh and slightly sharp note.
Texture also stands out. Homemade layers feel softer and less dense. The filling is thicker and more controlled, so it stays in place without soaking into the cake.
Ingredient Control
When you bake at home, you choose every ingredient. You can adjust sugar levels, select high quality chocolate, and control the consistency of the filling. This gives you a cake that tastes more natural and less processed.
Final Thought
If you want something quick, the store option works. If you want better flavor, better texture, and more control, this homemade version delivers a stronger result.
Troubleshooting and FAQ
How do I prevent the raspberries from sinking?
If you are folding raspberries into batter, toss them lightly in a small amount of flour before adding them. This helps them stay suspended instead of dropping to the bottom during baking.
Can I use white chocolate chips for the frosting?
You can, but it is not the best choice. Chips often contain stabilizers that affect melting. This can lead to a thicker or uneven texture. Baking bars with real cocoa butter melt more smoothly and give a better result.
What is the secret to a moist white cake?
The key is using both butter and oil. Butter adds flavor, while oil keeps the cake soft for longer. Also, avoid overbaking and always use room temperature ingredients for a smooth batter.
What are common white cake mistakes?
Overmixing the batter, which makes the cake dense
Using cold ingredients, which can cause uneven texture
Adding too much flour, leading to dryness
Skipping the crumb coat, which affects the final look
Pay attention to these details to get a soft and even crumb.
How do you store chocolate raspberry cake?
Store the cake in an airtight container in the fridge for up to four days. Let it sit at room temperature for about 20 minutes before serving so the texture softens and the flavors come through.
Why does white chocolate pair well with raspberry?
White chocolate is sweet and creamy. Raspberry is tart and bright. Together, they create balance. The richness of the chocolate is cut by the fruit, which keeps each bite from feeling too heavy.
Is it better to use fresh or dried raspberries?
Fresh or frozen raspberries are best for this recipe. They provide moisture and a natural flavor that blends well into the filling. Dried raspberries can be used as a topping, but they do not work the same way in the filling.
Let’s bake together! I will explain all the steps in detail in the written recipe. If you try this recipe, don’t forget to tag me on Facebook, and you can also follow me on Pinterest.